

Your shopping cart is currently empty.
Free EmbroideryClick Here
FREE shipping on orders over $249*

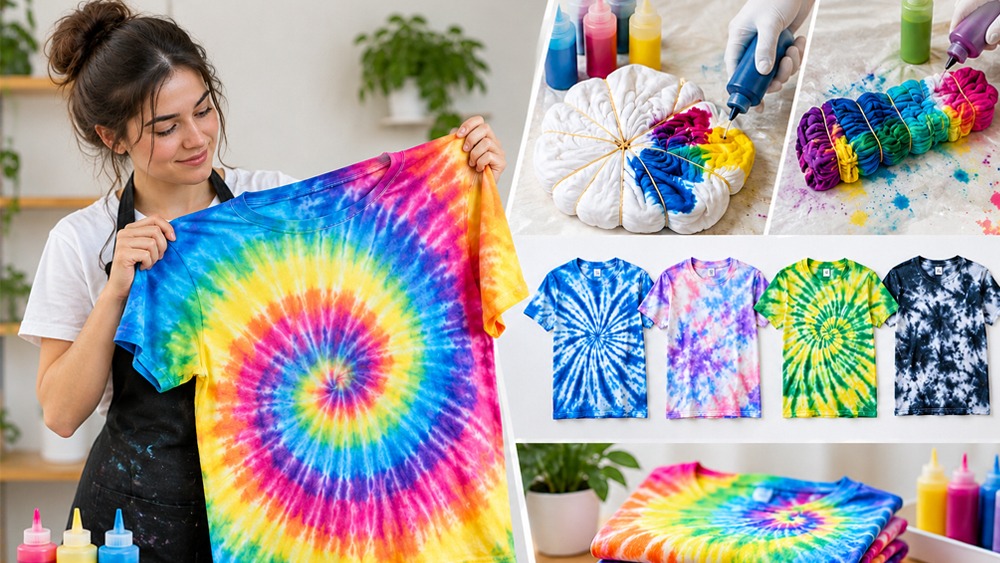
Tie Dye Shirts, as well as their art, is one of the most exciting areas in the clothes area for adding a splash of colour. This fun craft is easy, colorful and rewarding for all levels; whether it is time to refresh old clothes, or to make something totally new with friends.
Tie dye is a crafty technique of fabric art which is defined by folding and twisting or even crushing the textile and tying it using rubber bands or string and coloring it. The tie becomes a barrier to the dyeing and prevents some portions of the cloth from being dyed. This results in the formation of beautiful, unique prints, each of which is truly unique.
Tie Dye is essentially “resist” dyeing. When fabric is tightly rolled and tied up, the dye will not penetrate every thread. Rubber bands do not wipe out said areas into the color of the fabric underneath. Dark colors are absorbed by the open parts, and you'll get brightly colored designs when you unfold them.
The simple dyeing method has been utilized for thousands of years, and tie-dye became popular in today's culture. Resist-dyeing was used early in both Asia and Africa, and as far back as South America also. In the past, people have been doing this with historical techniques such as Japanese Shibori or Indian Bandhani, and thanks to these techniques, this clothing is even stronger. What people love to do with terms of clothing is to adorn them with dyed prints, and these ancient techniques are making sure that it stays that way.
During the 1960s and 1970s, tie dye enjoyed a whopping popularity in the U.S. It is seen as a symbol of peace, self-expression and free spirit. Today the fashion of tie dye t-shirts is back in fashion and in full scale! Considerations for buying bold and vibrant tops include casual wear such as festival fashion, lounge wear and crafts for the weekends. In essence, all people of all ages like to wear big colorful tops and casual custom dressings for festival outfits, lounge and weekend crafts.
Don’t miss this: 18 Most Popular Halloween Costume Ideas for Gen Z in 2026: Trending Styles & Looks
Put all your supplies together prior to your colorful craft. When everything is prepared, dyeing is smooth, easy and free of mess.
The key to vibrant and vibrant color is choosing the appropriate fabric. Fabric dyes absorb more easily by natural fibres such as 100% cotton, rayon and linen than by synthetic fibres such as polyester. You can make vibrant colors with blank t-shirts that will remain vibrant all the way through many washes.
See exciting comparison: Garment Dyed VS Pigment Dyed: Which One Will Last Longer?
Here is the basic checklist of items you need to start dyeing:
Cotton T-shirt
Fabric dye
Rubber bands
Gloves
Plastic covering
Squeeze bottles
Water
Plastic bags
Paper towels
Washing detergent
Color combinations are part of the fun and the better it is done, the better! Try classic rainbow colors or go for cool colors such as ocean blue and purple. For minimal muddy browns, consider placing similarly-colored items side by side. For instance, use pinks, yellows and oranges to look great together; whereas blues and greens will look refreshing and cool.
Check this out: Top 13 Trendy Hoodie Brands in 2026 for Business Owners

Looking forward to sharing your ideas? Take your place in their shoes and follow their easy-to-follow steps to a good result every time.
There are hidden factory finishes and oils to pre-wash out from the new shirt, so start at the beginning. Keep partially moist—damp cotton will absorb liquid dye more quickly and evenly than dry cotton.
Before you begin folding, determine the style you are looking for. Want a swirl? Ring love? Or a simple mess? If you already know your pattern, it will be much easier to fold!
Place a wet shirt flat on a dry table covered with a transparent surface. Smooth out large wrinkles with your hand. You'll twist, pleat, fold or scrunch the fabric into a dense form depending on the style that you decide on.
Tie snugly with heavy rubber bands around the rolled-up bundle of fabric. The bands have a few purposes - they help hold the shape of your shirt and they help prevent color bleeding between colors.
Wearing protective plastic gloves. Fill mixed dye bottles with dye and water. Press gently, using no heat, into your cloth increments. Be sure to squirt the liquid in the deeper folds but leave a few small white spaces so the colors will contrast.
After you are done with all sides of the bundle being wet and dyed, neatly put this bundle into a sealed plastic bag. Use a warm place to set the shirt in so that the color will chemically adhere to the cotton fiber.
Allow wrapped T-shirts to remain in a plastic bag for 8 - 24 hours. The longer you wait it will become even deeper and brighter your finished colors will be!
Once the waiting period has passed gently remove the bundle from the plastic bag. Don't remove your gloves as you will stain your hands dealing with the wet fabric.
First rinse your t-shirt in cold running water, then in warm water. Continue rinsing until the water is clear. Cut the rubber bands out and put your shirt in a separate place to clean in warm water and mild soap, then air it out to dry.
Have a look at: How To Tie-Dye A Shirt With Food Coloring
Make sure your shirt is folded all the way in order to get entirely different visual results. Individuals may be able to go through the most popular motifs and recreate them at home:
The most traditional tie dye is the spiral! Place a damp shirt on a flat surface. Grip the center of the chest in your fingers and twist in the direction of the Glock in a steady circular motion until the shirt is twisted into a disk. Take 3-4 rubber bands and fur her with 3-4 like pieces of pie, with each piece of pie a different color.
For a sweet heart shape fold the shirt vertically down the middle, collar to hemline. Using a washable marker, draw ½ of a heart along the ½ fold line. Fold fabric along this marker line to make a straight line, roll a rubber band tightly along the line and then color it with a favorite pink or red dye.
For a casual and laid-back appearance, the scrunch method is ideal! Just crumple the cloth with your hands into an unthought-out heap. Wrap rubber bands around the bundle to keep it together then squirt various colors randomly over the top for a cool marble effect.
Take out the shirt and pinch an area to determine either the centre of your bullseye or the airspace to make a hole in the middle. Pull the fabric taut up to create a tube. Put several rubber bands in the tube, making them the same distance apart. Using a variety of dyes, shade each section a different colour to form concentric rings of colour.
If you have not done these kinds of crafts before with your clothes, go with the simple folds or stripes, in diagonal or straight. When you first learn how to mix colors and use squeeze bottles, it's easier using classic T-shirts instead of working with more involved shapes to begin with.
If this is your ability and desire, the rubber bands will be your best tool for creating crisp designs. Alternate custom tie dye hooded sweatshirts or layering heavy-duty Gildan t-shirts using tight band placements to craft bold line patterns. The only thing to remember is to ensure you measure your size with a standard T-measurement guide, so that your cozy creations will fit snugly enough!
Take note of: Gen Z Fashion Trends 2026: The End of Trends & Rise of Personal Style
But there are no rules to follow when adding colors to your wardrobe! There are various methods that make it possible to dye any type of clothing in traditional dyes or in home materials.
Water soluble, fibre-reactive dyes have been traditionally used directly on damp fabrics. It is a very simple process! You just tie off parts of the garment with rubber bands or string, squeeze your liquid dye in places and leave it in to let it cure within the threads.
For crisp lines and clean patterns attention should be given to the manner in which the fabric is wound. Picking up small samples of cloth and tying it off tightly will stop the dye from filtering under the bands, resulting in good contrast between colored areas and bare fabric.
The standard cotton t-shirts are suitable for beginners as the natural fibers hold colors well. You get rich and vivid colors on each section of your pattern with soft and light cotton's liquid absorption.
Dyeing heavier fleece items takes a bit more patience and extra dye solution. Because thick fleece holds a lot of material, soak the fabric thoroughly with your squeeze bottle to ensure color reaches deep into the inner layers.
Give it a quick look: How To Tie Dye A Hoodie – Simple and Creative Guide
It's a lot of fun to take plain heavy fleece tops and color them up to make them look like a fun street type! Stretch out your sweatshirt and fold it out wide or tight or horizontally, as an accordion, then apply ample dye solution to ensure good thorough penetration through all the heavy sweatshirt layers.
The reverse dyeing method is a neat technique for dark-colored or black material. Rather than putting bright liquid dyes on white fabric, they use slow and light fabric strippers to lift off the original dark color to create high contrast patterns on dark tops, which are tan or white.
For dark colors, bleach dyeing is a popular choice since it is a quick dyeing method! Spread a bleach and water solution on tightly wrapped black cloth. Notice the ambient dark shade turning into rusty red, orange, or beige within minutes, and immediately rinse so that the reaction stops.
Important insights: How to Reverse Tie Dye with Bleach
By taking proper care of your newly dyed garments you can enjoy those bright, fun colors for years, and not have to worry about them soaking into other garments.
During the first washing, put the new design in the washing machine by itself in cold water. Uses a safe cycle and mild laundry detergent to remove any loose color particles.
Once a piece has run off with the same dark color as the toners there is a possibility for washing custom pieces in a similar dark color. Turn clothes inside out before putting them in the dry cleaner and opt for cold water cycles as heat will leach bright colours.
You might want to read this: How to Acid Wash a T-Shirt (Quick & Easy Guide)
Rinse your folded project, under cold tap water, off before it gets in the washing machine. When the water begins to become clear, take away the rubber bands and wash again in warm water.
In order for your Tie-Dye tank tops colorful designs to remain fresh and new-looking, make sure to hang-dry them away from direct sun rather than tumble drying at very high temperatures because both sunlight and high-temperature dryers will eventually cause the breakdown of dye molecules making the colors look dull.
In case the colors run into the white parts of the shirt during the rinsing process, do not dry the shirt! Instead, rinse the wet fabric under cool water or wash it separately with color-safe detergent.
Trivial touches may start to produce minor difficulties in simple projects. Even for the simplest of projects, there can be a few hitches if the basic preparations are skipped. Here are some common pitfalls to avoid to ensure whatever work you are doing remains clean and bright.
Synthetic fabrics such as 100% polyester or nylon fabric will not absorb regular fabric dyes well. With synthetic materials, the colors will fade fast down the drain of the toilet.
The more water you pour over your clothes, the more your garment will be filled with dye. When fully saturated with fabric, white color areas vanish and other colors flow together resulting in a single muddy brown color.
It's a lot of fun using all the colours in your kit on one shirt but you don't always get very tidy, do you? Colors placed opposite to each other on the work will combine onto a wet cloth to produce brown spots.
When rubber bands are not tight, they let the liquid dye get into areas where you didn't want it. Secure your bands tightly, and to prevent liquids from getting into hidden folds.
Accelerating the waiting will reduce the ability of the dye to react with the cotton. When clothing is washed too early, most of the bright dye is washed off, resulting in pastel garments.
Though it is not a rule, it is beneficial to remove the straps from your shirt before you rinse the residual loose dye so it doesn't stain clean areas. Be careful to thoroughly remove excess surface liquid before rubber bands finally release their holding power.
If fresh, wet items are thrown into the family wash, Drager, wreaths, pine cones, and other fresh and wet examples of creations can all be the cause of disaster. Loose dye can run onto other items of clothing, leaving your white and light pieces of clothing permanently stained.
Here are a few simple and easy tips you can use to create beautiful and designer-looking designs every time you sit to craft.
If you're a total beginner of the fabric dyeing, begin with easy bullseye rings or random scrunch pads. Learn some basic folding tips and tricks and then move on to more difficult shapes and multi-color designs.
Excellent quality of cotton material provides the ideal medium for the liquid dye application. Buying reasonable bulk wholesale t-shirts will provide ample amounts of cotton clothing to experiment on different patterns with your friends and family.
Pick two to four colors that go together nicely, for instance blues, purples and teals. Use warm colours in one group and cool colours in another to ensure effective colour contrast with clearly defined photographs.
When squeezing colour into a bound bundle leave little un-dyed white spots. These small no-dye areas allow dyes to bleed in a natural manner to other color areas.
Patience is crucial to making sure that colors last! Keep your wet and wrapped clothing within the plastic bag in a warm environment for a day at most so that colors can properly sink into the material.
Begin the process of rinsing your clothes with cold water first, and then move gradually toward warm water. Rinse your clothes until the outgoing water appears crystal clear.
Run your custom garments through two individual wash cycles by themselves before mixing them into normal laundry loads. This removes all lingering loose dye safely.
All dyeing kits have unique instructions on the ratios to mix them with water and the timing. Make sure to follow the instructions on the package of the kit you bought.
Learning how to design your own clothes at home can be really exciting and a fun experience for expressing yourself through fashion. By selecting good-quality cotton tops, applying basic folding methods, and letting the dye set correctly, you will create stunning Tie Dye Shirts that will make everyone turn their heads at you.
Fold a damp cotton shirt, secure sections tightly with rubber bands, squirt colorful dye onto sections, set, rinse, and wash carefully.
Let your dyed, plastic-wrapped shirt sit at room temperature for 8 to 24 hours so colors set deeply into the fibers.
Remove the shirt from the plastic bag, rinse thoroughly under running water until clear, snip rubber bands, and wash separately.
Wash the fresh shirt by itself in cold water on a gentle machine cycle with mild detergent to clear excess dye.
The scrunch pattern is easiest because you simply crumple the damp fabric into a tight disk and apply dye randomly.